Ginger Bisquite

Lifestyle, DIY, Family & Food

Top tips for creating a family bathroom

June 4, 2014 by Jenni Clutten | 3 Comments

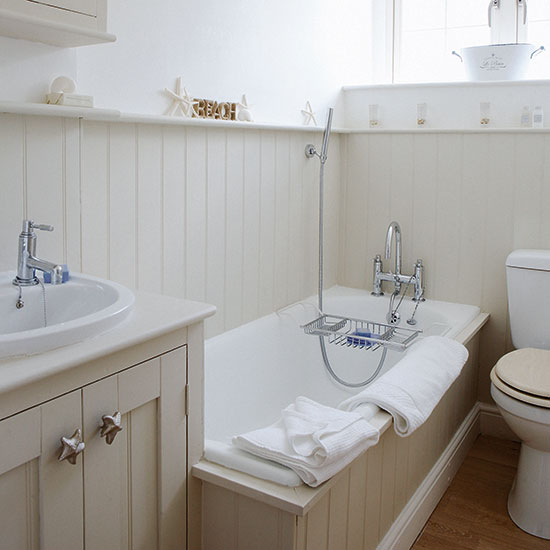
A bathroom can be small or large but we all know that it’s used by the whole family.  It should be an enjoyable space, suitable for children’s bathroom time but also parent relaxation, so here are my top tips for creating a family bathroom.

Make the best use of space
Start by planing the layout, to make best use of the space.  When designing a room I like to ensure we are getting the best possible solutions and ask myself;

  • What do we need? - toilet, bath, shower etc.
  • What would we like? – mosaic floor, free standing bath etc.
  • What is practical and affordable? - built in bath with shower,

You’d be amazed at the different layouts that are possible, even in a very small bathroom.  Changing where just one item is, can make a massive difference and turn a chaotic space into a haven.  I love to have a refreshing shower in the mornings, so a clever shower enclosure is a must.

Use clever storage
Like any room in the house, there is never enough storage space in a bathroom, especially if all you have is one tiny bathroom cupboard.  Pinterest is full of lots of very clever storage ideas, but the most simple is to install as many shelves as you can to maximise space.  Of course open shelves are great for the neat and tidy but using curtains, baskets or cupboards can allow you to hide children’s clutter from prying eyes.

top tips for creating a family bathroomPersonalise it
A great room is reflective of the people who live there.  Having trinkets in a bathroom can take up much needed space, but why not add a bit of interest through your towels.  There are so many gorgeous designs that can give you a particular style.  We have some Cath Kidston ones which I picked up at tk maxx a few years ago and there are some thrifty and stylish options at H&M.

Have a bathroom audit
On a regular basis I find it really useful to go through all our bathroom supplies and check what is out of date, unused and just taking up unnecessary space.  This allows me to clear space, and stock up on things before we run out.  And whilst I’m there I love to give the bathroom a good once over, a tidy bathroom makes a massive difference.  For a simple and thrifty bathroom cleaning kit, see Thrifty Mrs.

1 / / 3 / 4

Disclosure:  This is a sponsored post, but all thoughts, words and opinions are my own.

First Time Wallpaper’er

April 11, 2014 by Jenni Clutten | 3 Comments

wallpaper,beforeafter.TEXTI have an admission to make – despite lusting over many a design, I have never actually hung wallpaper.   Many times have I admired it, shared it and dreamed of it but never had it graced my walls.   I was a first time wallpaper’er.

That was until I moved into a house with floral wallpaper all over my sons bedroom and no time to remove it.  That’s the thing with wallpaper isn’t it, it’s so personal.  I wonder if anyone has ever moved into a house and kept the previous owners wallpaper long term.  We’re planning to live here for many years to come so when decorating our house I’m going for designs I really love without giving a second thought for resale potential.

I tested the ground of wall patterns when I installed cloud decals in the nursery and I absolutely loved the fun look they gave to the room. So, on with the wallpaper show!

You will need: (I watched the video tutorial on the  channel before I started)

  • Wallpaper Paste
  • Bucket
  • Stirrer
  • Wallpaper Brush
  • Sharp Knife
  • Scissors
  • Wallpaper
  • Microfibre Cloth
  • Ladder/Step Stool
  • Tape Measure
  • Spirit Level
  • Pencil

hanging wallpaperSONY DSC

 As novices, it seemed best to start with some inexpensive paper as a trial run.  This wallpaper is called Brooklyn and I got it on clearance in B&Q, £5 for 3 rolls!  We originally got it for our bedroom but I realised it would look great in Nye’s bedroom.  It’s paste the wall wallpaper so we mixed the wallpaper paste to its thickest setting and applied it straight to the wall before lining up the wallpaper. (And no, we didn’t remove the old wallpaper or start in the middle).  In the end we used about 1 1/2 rolls and it was easy to line up because it has a very busy repeat pattern.

In terms of timing, this first wall took us about 2 hours.  Because it was our first time with wallpaper we double checked all the measurements and then had to rehang the paper after I got a bit snap happy and trimmed too much off the bottom of the first sheet.  (At that point I was pretty fed up, but carried on regardless).  Despite this, in the evening we decided to hang our Marimekko Kippis wallpaper in the dining area (A cheeky Ebay purchase for £30).   Because we still had a huge amount of wallpaper paste lying around unused and all the tools still out it seemed sensible to continue.  The dining room wall only took an hour, as we already had a good wallpaper work flow worked out.
SONY DSCThere’s still much to finish off in the bedroom and dining area but I’m so pleased to know that we’ve at least started to put our own stamp on the house (and learnt a new skill).  They’ll be more to share in the next few weeks as the rooms start to take shape.

How about you?  Been lusting after some gorgeous wallpaper prints? Are you a pro or a first timer like me?
Love Chic Living and Love Your Home

Recycled Container Gardening

April 3, 2014 by Jenni Clutten | 15 Comments

Following on from my diy thrifty childrens garden earlier in the week I’ve been at it again, this time creating a tower of lettuces out of recycled bottles.  It’s all thanks to joining this amazing  on facebook where someone posted their bottle tower.  I used the guide on the container gardening website to make mine but only went up 5 bottles high so it was a bit more child size.SONY DSCrecycled container gardeningSONY DSC
Don’t those lettuce leaves look good? I just love the red tinged edges, I can’t wait for them to start growing bigger.  I find it quite amazing myself so I’m sure Nye will be intrigued.  The lettuce seedlings have grown fantastically well from seed, I used ‘Mortons Secret Mix’.

To make your own recycled container garden you need:

  • 5 plastic bottles
  • Scissors
  • String
  • Compost
  • Salad Leaves / Herb Seedlings

Then watch this .

In other news I am also so thrilled to say that my first seedlings planted directly into the ground have made their appearance.  I was just about to plant some more peas, thinking they’d failed when I saw their little heads poking proudly from the soil. I literally can’t tell you how out of this world excited I was to see them.  It made me feel like a proper gardener.
SONY DSCSONY DSCAnd then I turned my attention to the rest of my seed packets to find that there were more things to plant so I’ve sown some green headed calabrese, white strawberries (wishful thinking I reakon) hollyhocks, and then thought I’d be brave and sow my carott seeds in drills straight into the soil.  As a  precaution I have planted a row of onions next to them to try and deter the dreaded carott fly that everyone seems to go on about!SONY DSCSONY DSCThen there’s all those other exciting things, blueberries starting to flower, sweet peas getting bushy, that black hyacinth emerging, and having a go at regrowing celery from the root.
SONY DSC SONY DSC SONY DSCSONY DSC

p.s I started painting the veg patch wall black, and I’m kind of in love!  Can’t you just imagine all that fresh green vegetation against that slick black backdrop. It is all kinds of awesome and amazingly a complete flook that I picked up some black masonry paint at the scrapstore. P.s concrete blocks are a real pain to paint, all those nooks and crannys. Total transformation though, it changes everything from drab to fabulous.
black garden wall

Mammasaurus and How Does Your Garden Grow?
Rejoining the How Does Your Garden Grow crowd this week.

Create a heart photo wall

March 8, 2014 by Jenni Clutten | 10 Comments

SONY DSCHere’s a quick and easy DIY heart photo wall that will leave you with a fantastic and personalised piece of artwork for your wall.  The most difficult choice you face is where you’re going to put it!

You will need:
36 photo prints (it works best with square pictures so instagram is perfect.  I used printed.com to print mine.)
1 roll of washi tape
1 Blank wall

How to:

  1. Choose where you want to place the photos. (You’ll be surprised by how big the final image is.)
  2. I started by selecting 9 photos for the longest row,
  3. Add a small piece of washi tape to the top of each photo
  4. Attach each photo to the wall starting in the middle and working your way out.
  5. Working your way up, add 7 photos for the row above and then 4 photos for the top of the heart.
  6. Next work down from the row of 9, with a row of 7 then a row of 5, 3 then the final row of 1.
  7. Admire your heart photo wall

Heart photo wall

Scrapstore Finds

February 12, 2014 by Jenni Clutten | 23 Comments

scrapstoreIt’s no secret that I love to re-use and recycle and when I found out about Scrapstore I was itching to get into the nearest one to have a mooch about for some crafty items.

Scrapstores give you the chance to find art and craft materials at a fraction of the price you could find them anywhere else.

Some scrapstores are only open to schools and voluntary organisations but others open their doors to everyone.

All scrapstores have different means of accessing their scrap materials. In some you need to pay an individual membership fee, at others you simply pay for the scrap you take on the day.

Many scrapstores also have shops open to the public selling high quality art and craft materials from glue to paintbrushes to complement the scrap.”

Since we joined our local branch over the Summer we’ve already been several times, picking up scraps of unwanted paper, sticky silver tape, empty sweet jars and numerous other indescribable objects.  As a member we had to pay a £30 yearly individual membership fee which means we can pick up as much Scrapstore bits and pieces as we want.  There are Scrapstores all over the country, and you never know quite what you are going to find, but with a bit of imagination you can create some amazing things.  

Scrapstore Finds

Our local one always has loads of unwanted childrens toys and books, I particularly love the books as they are often ones I remember from my childhood.  Inside the Scrapstore there is also a Community Repaint Scheme and a Furniture Project.

Last week I picked up a small car mat, which you can see in the top picture.  Nye has really enjoyed playing with it since I brought it home and I can see him using it for years.  And, as soon as he outgrows it I know I can give it away for another child to make use of.  The other two items I’ve shown below I purchased, but I think you’ll agree that £5 for this stylish chair and £2.50 for two and half litres of unused and unopened masonry paint is a pretty good deal!

paint. Collage

There are scrapstores all over the country and you can find your nearest one on the Reuseful website.

How To Re-cover Dining Chairs

January 3, 2014 by Jenni Clutten | 22 Comments

recovering dining chairsHello and Happy New Year to you! It’s 2014 and I’ve already written my first to do list and on my list I wrote recover dining chairs (FINALLY).  I blogged about how we had bought a mid century dining table set on ebay way back in November and I’ve been wanting to do it ever since.

I’ve continued to search for the right fabric to recover the chairs.  I initially wanted to use a family friendly vinyl and I bought some really cheap black stuff (£2.99 x M) I spotted in Dunelm Mill as a trial run.  Unfortunately, when I got the vinyl home I really hated the shiny look and this made me feel very uneasy about spending much more than a few pounds on fabric to cover the seats.  However, they really did need recovering urgently as, in addition to being threadbare, they were now covered in sticky Nye hand prints of varying colours and textures.

Over Christmas as we were tidying I found some wood patterned fabric I bought from Ikea to use in our old kitchen.  It dawned on me that I had enough fabric to cover the four chairs and I thought it would look kitchy used on these old chairs.  Especially when we get the lovely Marimekko wallpaper up and try to create a mid century look.

DIY.chair.collage

 Here’s my How To Re-cover Dining Chairs Tutorial.

What You Need:
Fabric (Enough to cover the cushion covers and preferably in a thick and durable fabric.)
Fabric Scissors
Staple Gun
Staples
Hammer

Instructions:
1.Remove the seat pad from the chair (ours lifted off easily, you may have to unscrew it or lever it out.)
2. Lay out your fabric, upside down, and place your seat pad on top.
3. Turn the pad over to check you are happy with how the pattern is aligned. (Think about whether you want the pattern centered for example)
4. If you are happy with how the pattern looks, cut out your fabric to fit the seat pad. I gave myself quite a bit of extra fabric on each side to allow for mistakes.
5. Use the staple gun to attach fabric to the chair. Start by securing the centre of each side, pulling the fabric as tight as you can .
6. Work your way along the sides from the center, leaving the corners until last.

7. Pleat the corners by pulling the corner of the fabric diagonally towards to center of the seat base. 
8.  Next fold one side of the corner down so that the edge runs diagonal, then fold the other side down and staple.
9. Once all corners are complete, trim off any excess material and hammer down any staples that haven’t gone into the seat base completely.
10. Return seat pad to chair and secure.
11. (optional) You may want to use some kind of stain guard to protect the fabric.  (I haven’t done this yet but I’m interested to see if it helps keep the material clean.)

How To Recover Dining Chairs Continue Reading →

Garden Shed Renovation

October 21, 2013 by Jenni Clutten | 3 Comments

Garden Shed Renovation

Sorry for the rather extended absence over here.  As I have mentioned incessantly, we have been moving house.  But, although we have been reacquainting ourselves with moving boxes and packing tape this week, we are at least now emptying them and folding up the boxes ready to be recycled.

Believe it or not, it is now less than 5 weeks until my due date and it would be accurate to say that moving house has spurred me into the nesting stage perhaps slightly before I should be there.  I started by designing the nursery which I have now started painting.  Once I have a chance to paint the other walls I shall show it off to you all.

Last week the rain paused for a brief moment and I took the opportunity to make a  start with our garden shed renovation project.  There really are not enough hours in the day to get all my plans done, so I can only try my best to zoom around while Nye is napping.

Garden Sheds

Our new house is very well endowed in the shed department, we have two.  So, as soon we put the offer in on the house I was plotting out how we might use the larger shed as a lovely office and craft space for us to escape to.  Both of our shed are to the side of the garden as you can see in the picture above.  The shed I’ve been painting is the one behind the greenhouse that you can only just see.

Budget Breakdown so far:

Garden Shed Painting

Sources

I didn’t have any idea how much paint we would need so I bought the 5L tin just in case.  As it happens, I think one 2.5L tin would have been enough for the shed but I will also be painting our other smaller shed in the same colour and probably our garden gate.  I’m also using the paint brushes in the nursery so I decided investing in some nice ones would be a good idea.

Shed Before Collage.2

Shed During Collage

So far I’m really pleased with the progress, even after just one coat.    Editing the photos to post this has reminded me of the tatty state the shed used to be in and already just with one coat on it looks much better.  It is quite amazing how quickly you forget how things looked before which is one of the things I love about blogging as it allows you to remember how things were and appreciate all the hard work you put in.

That’s it for this week, let’s hope for a little more dry weather so I can get the second coat on.  Then next we are on to the insulation so we can hopefully use the shed in summer and winter.  As usual here’s my of inspiration.

Have you done any garden shed renovation?  Got any tips?

Creating a peaceful nursery – stylish sunday

September 29, 2013 by Jenni Clutten | 2 Comments

Our house buying is almost complete and now it is time to think about creating a peaceful nursery for our new arrival.

I love vibrant colours, which is why I painted the nursery in our last house a wonderful bright yellow.  This time around, with one child already and my due date looming in November, I’m seeking out a more peaceful vibe to try and calm my new baby nerves.  I love the idea of white walls but I actually think they can sometimes feel a bit stark and bright, by adding a little colour this should help soften up the room.

Taking Inspiration:
I was inspired by some other nurseries I noticed on this morning so I’ve made a collection of my favourite UK paint samples and style ideas on the polyvore board below.  I’ve also included the vinyl decals I bought this afternoon on ebay which I’ll be adding to the turquoise wall to give it a more fun look.  I used quite  a large vinyl decal of a tree in Nye’s old room and have heard good things about smaller ones so I’m looking forward to give it a go.  Although I love wallpaper, the cost of it soon adds up, even in a small room so I’m hoping these clouds will be a good alternative. (I’ve got to admit, I fell in love with them a little bit here.)

mint moodboard inspiration

Then once I had chosen my colour and feel I decided to put together a few of the items we already own with a few new things too.  I bought the amazing felt lampshade from Modernbaby in the sale for £6.  I probably do have a spare shade nocking around but I thought this one was too cute to pass up.  The cot bed is just an example though (although a very reasonable £99 from John Lewis) as we are reusing Nye’s old cotbed which we sourced via freecycle.

Peaceful Nursery

Selecting complementing products
I really think the nursery above has a traditional yet modern feel.  The mint colour could easily look babyish but I think the use of monochrome really makes it feel a bit more unique.  I know it’s quite blue-ish but I actually see it as a really girly room.  That said, I still think it would look awesome for a baby boy.
Creating a sense of peace
Thinking back to when Nye was a newborn we were very lucky to be sent some amazing gifts and I was particularly grateful for a fantastic room fragrance.  It really helped me to enjoy those evening feeds.  I have no idea if it helped Nye to have any kind of understanding of night time but I enjoyed it, and as they say, contented mum means contented baby!

Getting the right lighting can also be helpful when creating a peaceful nursery.  I recently took a punt on a Cloud B Tranquil Turtle which I found in the Zulily sale for £20 which we love. (Zulily only sell items for limited periods so I have linked to the amazon listing)  The turtle acts as a fantastic nightlight and gives out a mesmerising blue wave effect that moves like waves across the walls and ceiling.  There are loads of settings, moving waves or static as well as two different sound affects, waves and waves with calming music.  It’s a great addition to any room and I think Neil is debating getting one for our bedroom we find it so relaxing.  So, for setting a bed time routine for a baby I think this will be awesome.

DISCLOSURE
This is not a sponsored post, I have selected all the items in the post myself and purchased, love and use many of them already.